3.5.3 样式属性设置
在样式的新增和修改设置中,我们都将看到如下的界面:
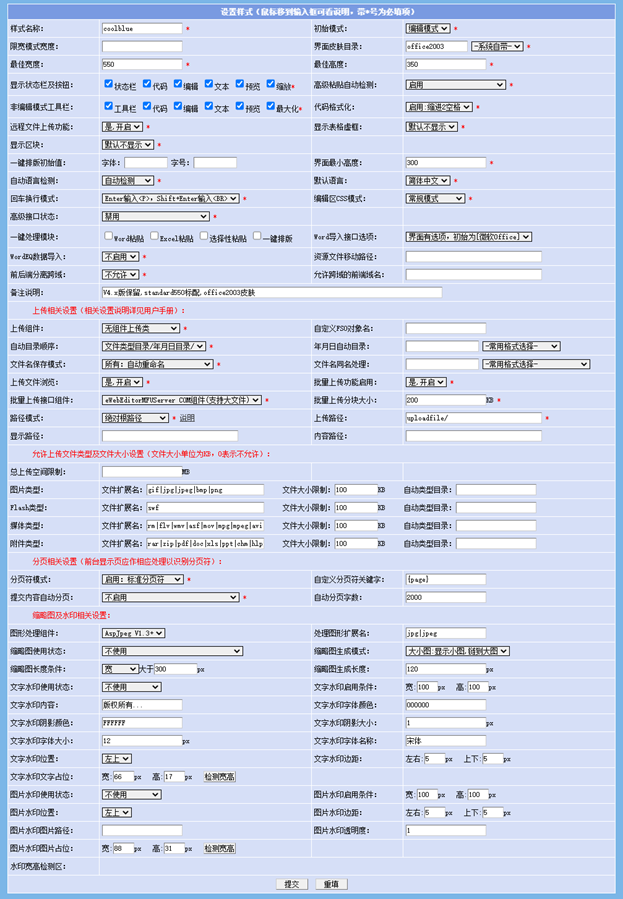
在以上的操作界面输入框中,鼠标移到指定的输入框上,会看到有更为详细的设置说明。
注意:不同版本(ASP版, PHP版, .NET版, JSP版)的设置选项可能会有一些不同,但总体基本是一样的。
普通设置部分
l 样式名称
样式名称应是唯一的,取一个比较好记的名称,同时将用于调用。注意只能是英文字母数字形式。
如下面的调用中,"coolblue"指的就是这个名称。
|
<IFRAME ID="eWebEditor1" SRC="ewebeditor.htm?id=XXX&style=coolblue" FRAMEBORDER="0" SCROLLING="no" WIDTH="550" HEIGHT="350"></IFRAME> |
l 初始模式
编辑器共有4种模式:代码模式、编辑模式、纯文本模式、预览模式
初始模式,指的是页面打开时,默认使用的模式。
l
限宽模式宽度
指定是否启用限宽模式,及设定限宽模式时的宽度值。如果留空,则不启用。可以设置为有效的宽度值,可以带单位,如“500px”。如果此值有设,则在编辑器前台只能在固定的宽度中编辑内容。更有效保证编辑器编辑区与应用系统前台显示页内容显示区的宽度一致,保持所见即所得的效果。
l
界面皮肤目录
指定界面皮肤定义的文件夹名。所有可设的文件夹名在“ewebeditor/skin/”文件夹中。可以从其后的下拉框中选择系统自带的皮肤。
eWebEditor V5.0版系统自带10套皮肤,分别为:blue1、blue2、green1、light1、office2000、 office2003、officexp、red1、vista1、yellow1。默认是“office2003”。V9.0版新增:flat1、flat2、flat3、flat4、flat5、flat6、flat7、flat8、flat9、flat10。
当然,您也可以自己定制一套皮肤,然后存放到skin目录中,并在此定义引用。
l 最佳宽度
编辑的最佳调用宽度,通过此设置后,然后查看预览,就可以直观的看到自己设定的编辑器大约在调用时用多大的宽度最合适。单位为象素px.
l 最佳高度
编辑的最佳调用高度,通过此设置后,然后查看预览,就可以直观的看到自己设定的编辑器大约在调用时用多大的高度最合适。单位为象素px.
l 显示状态栏及按钮
设定在页面打开时,编辑器下方的状态栏及状态栏上的按钮是否显示。有四种模式按钮的可见模式可选:“代码”、“编辑”、“预览”、“文本”。当状态栏设为不显示时,按钮的设置无效。
当您的应用系统最终用户只需要可视编辑模式,而不需要其它的模式时,可以通过设定取消状态栏选项选定实现。
l 高级粘贴自动检测
指定当操作者在编辑器中粘贴时,是否使用高级粘贴功能。当启用时,会提示客户端安装高级功能控件以实现高级粘贴功能。高级粘贴功能包括:Word粘贴、Excel粘贴、图片粘贴、截屏粘贴、选择性粘贴、资源管理器多图片粘贴、等。未启用时,可以使用一般的粘贴功能,没有更多高级粘贴功能。强烈建议启用。
V7.0版增加强制纯文本粘贴选项,当选用此项时,前台操作的粘贴都将自动转换为纯文本格式。
l 非编辑模式工具栏
设定在非编辑模式下,包括代码模式、纯文本模式、预览模式下,工具栏及工具栏上的按钮是否显示。当工具栏设为不显示时,其它按钮的显示设置无效。
l 代码格式化
通过这项设定是否启用自动代码格式化功能。当启用代码格式化功能时,在“代码”模式下,会按标签的性质作自动的缩进处理,使得代码的可读性更强。默认为开启。
l 远程文件上传功能
指定是否允许上传远程文件,默认是“允许”。当设为“不允许”,工具栏的“远程自动上传”按钮功能将无效。
远程文件上传功能,能把其它站点上的图片文件上传到自己的站点内。关于远程文件的功能,请参见相关章节的说明。
l 显示表格虚框
指编辑器页面打开时,初始的“显示或隐藏指导方针”功能是开的还是关的。此处只是初始值,最终用户可以通过点击工具栏上的“显示或隐藏指导方针”图标,使用此功能。
当“显示或隐藏指导方针”功能为打开时,表格的边线会有一条虚线显示,即使border=0。这样方便表格的选定操作,及了解表格当前的定位。
l 显示区块
指编辑器页面打开时,初始的“显示区块”功能是开的还是关的。此处只是初始值,最终用户可以通过点击工具栏上的“显示区块”图标,使用此功能。
当“显示区块”功能为打开时,段落等区块会以虚线加背景的形式显示出来,以方便查看内容布局。
l 一键排版初始值
对于于前台一键排版对话框界面的初始值。含以下设置:字体、字号。如未设置,则前台也相应的没有初始值。这里的值必须是在字体或字号下拉框中可以看到的值,比如字号可以设为“四号”。
l 界面最小高度
允许前台调整界面高度的最小值,适当设置此值,使操作人员可以恢复初始高度,以像素px为单位。
l
自动语言检测
(注:多语言版才有这项设置)
当此选项设置为“是”时,eWebEditor将自动检测客户端操作系统的语言环境,并选择适合其环境的语言界面。当未找到适合的语言包时,将按"默认语言"中的设置进行显示。
当此选项设置为"否"时,不管客户端操作系统是什么语言环境,都将使用"默认语言"中的设置。
l
默认语言
(注:多语言版才有这项设置)
eWebEditor默认使用的语言界面。参见"自动语言检测"设置。
l
回车换行模式
在编辑器中按回车键时,可以代表输入段落<P>或换行<BR>。两种模式可选。
不建议使用<BR>模式,使用<BR>模式会失去很多段落的功能效果。如果只是为了中文的段间距,建议使用样式控制。如:
p {martin-top:0px;margin-bottom:0px}。
使用以上样式定义,可以使用输入段落<P>与输入<BR>的表现效果是一样的。
l
编辑区CSS模式
有两种模式可选:常规模式和Word导入模式。当使用Word导入模式时,能最佳实现Word文档导入或粘贴时的效果。
l
高级接口状态
选择是否启用高级接口功能。高级接口指通过程序可以完全动态的改变eWebEditor的某些重要参数。特别是指有可能涉及到安全的参数。只有在此处设置了才会相应开启不同模式,默认为禁用。有以下三种选项:
禁用:禁用高级接口功能。
启用一般接口(明文cusdir):此项为以明文形式传递参数,用来自定义上传路径,专门针对cusdir参数是否启用的设置。一般用于按不同的用户或不同的栏目把文件上传到不同的文件夹。如:ewebeditor.htm?id=content1&cusdir=user1/abc/,要使这里的参数cusdir生效,必须在此处启用这项设置。实际上传路径=后台设置的上传路径+cusdir设置的值,如后台设置的上传路径为uploadfile/,则实际上传路径为uploadfile/user1/abc/。此参数以明文方式传递,接口代码简单,但弱安全。
启用高级接口(Session安全):此项为以Session的方式传递参数,能够实现用程序动态设置多种有关安全的重要参数。如:路径模式、上传路径、自定路径、内容路径、显示路径、上传文件大小、空间限制大小、空间限制路径、文件浏览开启,等多项参数。具体使用方法请参见“高级Session安全接口”章节。
l
一键处理模块
(V8.0版新增)当选中设置了某项,则前台操作相应功能模块时,不再弹出选项选择对话框,直接使用相应功能的默认选项直接处理。方便您统一处理文档格式,操作更快。可设置的模块有:Word粘贴、Excel粘贴、一键排版。
l
Word导入接口选项
(V8.3版新增)
“界面有选项”指在前台界面上,编辑用户可以选择使用哪个接口,这里设置一打开界面时的初始值。
“界面无选项”指在前台界面上,编辑用户不可以选择使用哪个接口,编辑用户看不到接口选择项,系统自动按照您设的接口进行处理。
默认选项是:界面有选项,初始为[微软Office]。
l
WordEQ数据导入
(V10.5版新增)
WordEQ是一个需要另外购买的公式编辑器功能插件。只有当您购买了此插件后,此项设置才会有效。
当选择“启用”,这时从Word中拷贝或导入的公式数据,会带入可再编辑的数据,在编辑器里双击公式可以在线直接用WordEQ编辑公式。
l
资源文件移动路径
(V11.0版新增)
使用此路径设置功能,可以把eWebEditor自带的资源文件移到自已想要的目录中,使得最终浏览用户看不到编辑器的路径,起到隐藏编辑器路径的作用,起到一定的安全保护效果。系统自带的资源文件是指,如:插入表情图标的图标文件,插入附件时的文件类型图标,共享文件。
设置说明示例:
比如eWebEditor程序所在目录是:http://yoursite.com/myadmin123/ewebeditor/
您想把里面的自带图标移动:http://yoursite.com/myfile/
则您需要作以下2步操作:
1) 把 ewebeditor目录下的sharefile/ 和 sysimage/ 和 plugin/ 这3个目录拷贝到您的 /myfile/ 目录下。
2) 在编辑器后台,“资源文件移动路径”这项设为:http://yoursite.com/myfile/
(注:设置的路径必需以斜线 ”/” 结尾,原ewebeditor目录下的文件不能删除。)
以上设置后,当在您网站编辑器里录入的数据中含有这些图标时,发布后,浏览用户看到的是 myfile/ 这个路径,浏览用户看不到实际ewebeditor 是在哪个目录下。
最终代码,对比如下:
没设前代码:<img src="http://yoursite.com/myadmin123/ewebeditor/sysimage/file.gif">
设置后代码:<img src="http://yoursite.com/myfile/sysimage/file.gif">
l
前后端分离跨域
是否允许开启前台端分离的跨域访问。允许,则后端可以和前端在不同的域。不允许,则跨域访问不被允许。
l
允许跨域的前台域名
当上一项“前后端分离跨域”设为允许时,这项设置允许的域名。格式上,要含有http或https,如有端口号,要指定,格式比如:http://ewebeditor.com:8080 或 https://www.ewebeditor.com
或 http://你的前端域名:端口号
l
备注说明
对此样式的概括说明,方便记忆。
上传文件路径相关设置
l 上传组件
在不同的平台上,eWebEditor提供了对多种上传组件或类的支持,使您可以跟据您的WEB服务器的情况,使用适合自己的上传方法。
以下为各版本当前支持的上传方法列表:
ASP版:无组件上传类(默认), ASPUpload,
SA-Fileup, LyfUpload
.NET版:.NET自带上传方法(默认)
PHP版:PHP自带上传方法
JSP版:JspSmartUpload, commons fileupload(默认), struts2(V9.0新增), struts2.5(V11.1新增), webwork2(V9.8新增)
l 自定义FSO对象名
注:只有ASP版有此项设置。(V8.0版新增)
当您出于特别安全原因,而在服务器对FSO对象改名了时,您可以使用此项设置,填入您的实际FSO对象名,则程序仍可以正常运行。
l 自动目录顺序
用于设置自动日期目录和自动文件类型目录的先后顺序。只有当同时启用了自动日期目录和自动文件类型目录时,此设置才会有意义。可选值有:
文件类型目录/年月日目录/:先类型后日期,如:uploads/image/201102/xx.gif
年月日目录/文件类型目录/:先日期后类型,如:uploads/201102/image/xx.gif
l 年月日自动目录
通过此设置,指定是否在上传文件的同时,自动创建日期格式的目录。留空则不启用。支持格式完全自定义,可以在输入框中使用系统提供的日期关键字。支持的关键字有:
{yyyy}:4位年 {yy}:2位年
{mm}:2位月 {m}:1位或2位月,无前导0
{dd}:2位日 {d}:1位或2位日,无前导0
{hh}:2位时 {h}:1位或2位时,无前导0
{ii}:2位分 {i}:1位或2位分,无前导0
{ss}:2位秒 {s}:1位或2位秒,无前导0
后面的下拉框,提供了最常用的格式选择,您可以直接在下拉框中选择一项,则会自动填写此输入框。以下为示例:
留空:(默认),不启用,不创建目录,直接存到指定上传目录。如:uploads/xxx.gif
{yyyy}/:在指定上传目录下,按年格式创建目录。如:uploads/2009/xxx.gif
{yyyy}{mm}/:在指定上传目录下,按年月格式创建目录。如:uploads/200901/xxx.gif
{yyyy}/{mm}/:在指定上传目录下,按年月格式创建目录。如:uploads/2009/01/xxx.gif
{yyyy}{mm}{dd}/:在指定上传目录下,按年月日格式创建目录。如:uploads/20090101/xxx.gif
{yyyy}/{mm}/{dd}/:在指定上传目录下,按年月日格式创建目录。如:uploads/2009/01/01/xxx.gif
a{yyyy}b/:在指定上传目录下,按年格式创建目录。如:uploads/a2009b/xxx.gif
a{yyyy}/b/:在指定上传目录下,按年格式创建目录。如:uploads/a2009/b/xxx.gif
注意:由于URL标准的统一,不建议用中文或其它特殊字殊,建议只用英文字母和数字为文件夹名。
l
文件名保存模式
设定当上传文件时,保存到服务器上的文件名的命名模式。
注:虽然支持按原名上传,但基于各版本浏览器、各种浏览器、各种服务器对中文解释的可能问题,还是建议采用全部自动重命名模式。使用自动重命名的英文数字文件名,以确保所有浏览者都可以正常浏览到相应的文件。
可选值有:
所有自动重命名(默认):所有上传的文件都自动重命名为日期时间格式的文件名。推荐使用,可以确保各浏览者都可以正常访问文件。
所有原文件名:所有上传的文件都按原名保存到服务器,如重名则采用后面的“文件名同名处理”规则。
附件按原名,其它自动重命名:附件类型的用原名保存,其它类型自动重命名。以方便下载时可以看到原来的可读性文件名。
l
文件名同名处理
当上传文件启用原名保存模式时,如上传的文件名服务器上已经存在,则采用此处的设置自动处理。此项支持关键字匹配设置。支持的关键字有:
{name}:表示原文件名
{time}:表示自动的日期时间值
{sn}:表示自动的序号值
常用的格式有:
留空不填:表示替换已经存在的文件
{name}-{time}:表示原名+自动日期时间值,如上传“测试.doc”,重名时保存为“测试-20110101232323.doc”。
{name}-{sn}:表示原名+自动序号值,如上传“测试.doc”,重名时保存为“测试-1.doc”或“测试-2.doc”,类推直到不存在同名。
在关键字外可以加入任意自己个性定义,如“news_{name}_create_{time}”,则保存为“news_测试_create_20110101232323.doc”。
l
上传文件浏览
指是否允许操作人浏览并插入已上传的图片等文件。此设置默认为开启。
如果开启此功能,则在前台插入图片、插入媒体、插入FLASH、插入其它文件的对话框中会多一个“浏览”服务器上相应文件的按钮,如下图:
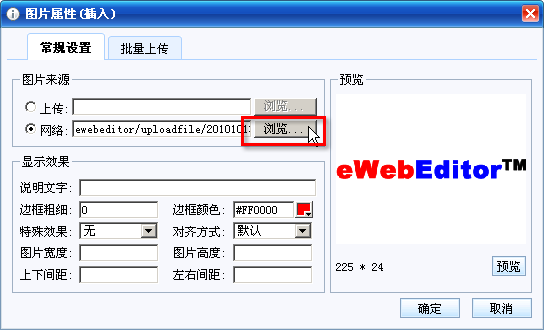
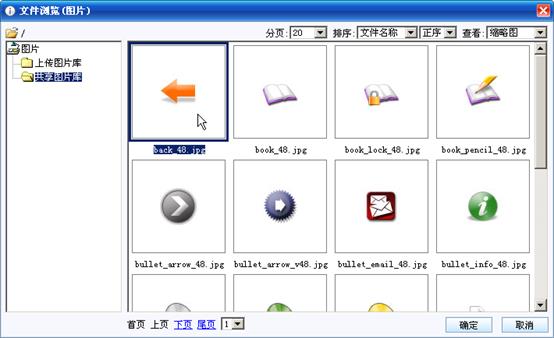
点击浏览按钮,将出现下图所示的文件浏览对话框。具有文件夹浏览。具有按文件名称、文件类型、文件大小、文件修改时间排序功能,正序和倒序可选。具有缩略图、详细资料、图标、列表四种查看模式。如下图:
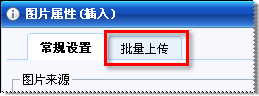
l 批量上传功能启用
设定是否启用批量上传功能。当禁用此功能时,前台有使用批量上传的页面将看不到批量上传功能。当禁用时,下图中的批量上传选项卡将看不到:
l 批量上传组件接口
不同的开发语言有不同的组件可供选择。不同的组件会带来不同的处理效率和不同的支持大文件情况。
ASP版:建议启用eWebEditorMFUServer组件,以支持大文件上传。ADO文件流不支持大文件。
PHP/ASP.NET/JSP:建议使用其环境自带的组件接口。
l 批量上传分块大小
批量上传同时带有大文件上传功能,可以把一个文件拆分为多个小文件分批上传,大大加快上传速度,防止超时错误,并能适应不同的网速情况。且含上传进度条显示。
对于网速比较快的环境,如内网,建议把值设大,以加快上传速度,建议设为4000K以上。
对于较快的互联网环境,建议把值设为一般值,建议为2000K。
对于很慢的互联网环境,建议把值设小,建议为500K。
您可以根据您网络的实际情况,设为适合您网络环境的值,以达到最优化。
l 路径模式
有四种路径模式可供选择:相对路径,绝对根路径,绝对全路径,站外绝对全路径。这多种路径模式,能完全满足站点迁移及各类应用系统在文件路径上的需要。
您需要选择哪种模式,只要从下面的样例中选择您要的格式,即能确定。
相对路径模式:最终文件格式如: src="../xxx/xxx.gif"
绝对根路径模式:(默认模式)最终文件格式如: src="/xxx/xxx.gif"
绝对全路径模式:最终文件格式如: src=http://www.yoursite.com/xxx/xxx.gif
站外绝对全路径模式:最终文件格式:
src=http://www.othersite.com/xxx/xxx.gif
l
上传路径
是指上传文件保存的路径,默认设置为"uploadfile/",即实际保存于ewebeditor/uploadfile/目录。
这里设置的路径是相对ewebeditor根目录而言的。
例1, 如您的系统目录结构如下:
eWebEditor目录:/ewebeditor/
上传文件准备存放的目录:/uploads/
则"上传路径"应设为"../uploads/"
例2, 如您的系统目录结构如下:
eWebEditor目录:/ewebeditor/
上传文件准备存放的目录:/ewebeditor/uploads/
则"上传路径"应设为"uploads/"
注意:当使用站外绝对全路径模式时,此处的上传路径设置的是绝对物理路径,如“c:\my\uploads\”。这是与其它路径模式不同之处。
l
显示路径
只有使用"相对路径模式",才有必要对此项进行设置。"显示路径"意指的是内容显示页文件所在的路径。如新闻系统有一个命名为"show.asp"文件的页面,此页面实现的是把数据库中指定记录的新闻标题及用编辑器编辑过的新闻内容读出,并显示给网站的浏览者。前面指的"显示路径"就是"show.asp"文件所在的路径。
注意:显示路径的设置必须以"/"开头。
例1, 如您的新闻系统目录结构如下:
/news/show.asp
则"显示路径"应设为"/news/"
例2, 如您的新闻系统目录结构如下:
/mysystem/mynews/shownews.asp
则"显示路径"应设为"/mysystem/mynews/"
l
内容路径
只有使用"相对路径"和”站外绝对全路径” 模式,才有必要对此项进行设置。"内容路径"意指编辑的内容以HTML代码表示时,此时的路径格式。设置值应为相对路径形式。
例1:如您的新闻系统的目录结构如下:
内容显示页路径: /news/show.asp
上传文件保存路径: /news/uploads/xxx.gif
则"内容路径"应设为"uploads/"
例2:如您的新闻系统的目录结构如下:
内容显示页路径: /news/show.asp
上传文件保存路径: /uploads/xxx.gif
则"内容路径"应设为"../uploads/"
例3:当使用站外绝对全路径模式时:
内容路径设为”http://www.othersite/xxx/uploads/”
三种路径模式,都有其各自优势之处,具体看您的需要进行选择。
以下为路径模式选择一般规则,您可以根据自己的实际情况选择,不一定非得遵守以下规则:
l
"绝对根路径模式":整站系统程序常用
如果上传文件保存目录,针对整个站点,是固定的,整个站点有多个应用系统,所有上传文件都保存于一个共用的目录中,此种情况,我们建议您使用"绝对根路径模式"。此种结构,只要上传文件目录不变,站点中所有的程序都可以任意移动,内容中的链接也不会失效。此种结构的好处在于,无论内容显示页在什么目录,您可以正确的链接到相应的文件。
l
"相对路径模式":独立子系统常用
如果您的系统相对站点独立,各个系统都有自己的上传文件存放目录。此种情况,我们建议您使用"相对路径模式"。此种结构,在系统迁移时,只要把整个系统中的所有文件一起移动即可。但一个系统中的内容,如在其它系统中调用显示,可能会链接错误。
l
"绝对全路径模式":邮件系统常用
当把编辑器集成在邮件系统发送内容表单中使用时,如果发送的内容中带有链接或图片等HTML格式的内容,其中的路径必须使用绝对全路径。这样收件人,收到的内容中的文件路径才不会出错,才能正常显示相应的图片等信息。
l
“站外绝对全路径模式”:文件服务站应用
当您计划使用单独的文件服务站点,各系统或网站的上传文件都传到指定的文件服务站点中。或上传文件需要放在另一个磁盘。即上传文件与编辑器程序,不在同一个站点内。此时需要使用站外绝对全路径模式,所有文件链接到你的文件服务站点,以http形式开头路径地址。使用此模式时,需要注意您系统权限的设置。
相对路径的参数设置是本配置的一个难点。为更好的说明使用相对路径模式时,各参数的设置方法,下面提供几个实例帮助您的理解。
例1: "应用系统目录"、"上传文件目录"、"eWebEditor目录",三个目录全部独立分开
计划目录结构:
eWebEditor所在目录: /ewebeditor/ewebeditor.htm
上传文件存放目录: /uploads/xxx.gif
内容显示页文件所在目录: /news/show.asp
相对路径模式的参数设置:
上传路径: ../uploads/
显示路径: /news/
内容路径: ../uploads/
例2: "上传文件目录"、"eWebEditor目录"都在"应用系统目录"中
计划目录结构:
eWebEditor所在目录: /news/ewebeditor/ewebeditor.htm
上传文件存放目录: /news/uploads/xxx.gif
内容显示页文件所在目录: /news/show.asp
相对路径模式的参数设置:
上传路径: ../uploads/
显示路径: /news/
内容路径: uploads/
例3:、"eWebEditor目录"独立,"上传文件目录"在"应用系统目录"中
计划目录结构:
eWebEditor所在目录: /ewebeditor/ewebeditor.htm
上传文件存放目录: /news/uploads/xxx.gif
内容显示页文件所在目录: /news/show.asp
相对路径模式的参数设置:
上传路径: ../news/uploads/
显示路径: /news/
内容路径: uploads/
上传文件类型及大小设置
l
总上传空间限制
上传文件夹允许的空间最大值。留空则不限制。当上传文件夹空间占用达到此值时,各类文件都不能上传。单位MB。默认为空,不限制。
l
图片文件类型及限制
允许上传的图片文件类型及每个图片文件大小允许的最大值。
此设置将作用于“插入或修改图片”对话框中的文件上传。
默认文件类型:gif, jpg, jpeg, bmp
默认最大限制:100KB
自动类型目录:默认为空,表示不启用。如未启用时文件是上传到“uploads/”,当此项设置为“image”,则此类文件将上传到“uploads/image/”目录中。
l
Flash文件类型及限制
允许上传的Flash文件类型及每个Flash文件大小允许的最大值。
此设置将作用于“插入或修改Flash动画”对话框中的文件上传。
默认文件类型:swf, flv
默认最大限制:100KB
自动类型目录:默认为空,表示不启用。如未启用时文件是上传到“uploads/”,当此项设置为“flash”,则此类文件将上传到“uploads/flash/”目录中。
l
媒体文件类型及限制
允许上传的媒体文件类型及每个媒体文件大小允许的最大值。
此设置将作用于“插入自动播放媒体”对话框中的文件上传。
默认文件类型:rm, mp3, wav, mid, midi, ra, avi, mpg, mpeg, asf,
asx, wma, mov
默认最大限制:100KB
自动类型目录:默认为空,表示不启用。如未启用时文件是上传到“uploads/”,当此项设置为“media”,则此类文件将上传到“uploads/media/”目录中。
l
附件文件类型及限制
允许上传的其它文件类型及每个文件大小允许的最大值。
此设置将作用于“插入附件”对话框中的文件上传。
默认文件类型:rar, zip, pdf, doc, xls, ppt, chm, hlp
默认最大限制:500KB
自动类型目录:默认为空,表示不启用。如未启用时文件是上传到“uploads/”,当此项设置为“other”,则此类文件将上传到“uploads/other/”目录中。
分页相关设置
注:您的前台显示页应作相应处理以识别分页符,您的前台才会有相应的分页效果。关于标准分页符的处理,可以参考我们提供的示例代码文件:_example/pagination.asp(.aspx/.jsp/.php)。
l 分页符模式
不启用:禁用所有分页相关功能,当选择此项不启用时,所有分页相关功能都不能使用。
启用标准分页符:启用以eWebEditor规范定义的分页符,支持分页标题,标准格式如下:
|
<!--ewebeditor:page
title="第N页小标题"--> |
启用自定义分页符:把后面设置的“自定义分页符关键字”作为分页符。如:
|
第1页正文HTML代码 |
l
自定义分页符关键字
当“分页符模式”选择“启用自定义分页符”模式时,此项设置为分页符关键字。前台显示页将按这个关键字进行分页处理。默认是:{page},如也可以设为{nextpage}、[page]、{$page$},等您觉得较好的分页符。
l
提交内容自动分页
如使用此功能,则可以在您点您的“提交”按钮发布内容时,自动进行分页处理。有三个选项:不启用、部分启用(内容中已有分页时不启用)、完全启用(内容中已有的分页会被替换)。如启用,自动分页将依后面的“自动分页字数”设置的值进行自动分页。
l
自动分页字数
“自动分页字数”的设置值在两处功能上用到,一个是在分页管理对话框中的自动分页字数默认值,一个是当启用“提交内容自动分页”功能时的分页值。此值以实际字符数为准,英文字符和中文全角字符都算1。实际自动分页后的每页字数只会大于此值,因为自动分页不会截断已有的各元素对象,如段落、表格等。自动分页不会把一个表格截断分到两页,当字数到达自动分页值时,只会在表格后插入分页符。其它对象一样如此处理,以保证每页的完整性。
缩略图及水印相关设置
l
图形处理组件
选择您想使用的图形处理组件,当前只有一种可选,预留以后扩充。
l
处理图形扩展名
系统只会对符合指定的扩展名的文件使用缩略图或水印功能。使用此设置,您可以只对bmp格式的图形使用缩略图或水印功能,而不对jpg格式的使用此功能。
l
缩略图使用状态
通过此设置控制缩略图功能的打开或关闭。有三个选项可选:不使用、使用、模拟使用。当为“不使用”时,与缩略图功能相关的其它设置都无效。
模拟使用:此项为一特别设置,实际并没有使用缩略图组件而生成一个小的缩略图文件,只是在上传图片文件对话框中,通过自动同比例改变图片的显示宽高,以达到与缩略图一样的效果。
l
缩略图生成模式
有三种模式可选:
大小图:显示小图,链到大图:保留原图,对满足生成缩略图条件的上传图生成缩略图,在编辑区中显示小图,小图有一个链接,点击小图会链接打开原图。
大小图:显示大图:保留原图,对满足生成缩略图条件的上传图生成缩略图,在编辑区中直接显示原图,小图只用于上传文件接口调用。
只生成小图:对满足生成缩略图条件的上传图生成缩略图,并不保原图。
l
缩略图长度条件
当图形的宽度或高度大于指定的值时,才会使用缩略图功能。单位px。
l
缩略图生成长度
当图形文件满足缩略图生成条件时,由此处指定生成的缩略图的大小。如原图形的宽度大于高度,则生成缩略图的宽度为此处指定的值;如原图形的高度大于宽度,则生成缩略图的高度为此处指定的值。缩略图将按原图的宽高同比例缩小。单位px。
l
水印有效模块
上传图片总共有三种类型:普通上传、本地上传、远程上传。通过此项设置,您可以指定在相应的模块是否启用水印功能。选中则为启用,不选则为不启用。
普通上传:指点“插入或修改图片”按钮上传的图片。
本地上传:包括Word导入、Word粘贴、本地自动上传、截屏、我的电脑拷贝等本地自动处理图片。
远程上传:指当从其它网站拷贝内容含图片时,从其它网站把图片抓到自己服务器上,所操作的图片。
l
文字水印使用状态
有三种状态可选。
不使用:不使用文字水印功能,所有其它与文字水印相关的参数设置无效
使用:使用文字水印功能,注意填写文字水印相关的其它参数设置
前台用户控制:使用此模式时,在前台上传图片的对话框中,会有是否启用水印的选项,用户勾选则启用,用户没勾选则不启用。由操作用户决定是否启用。
l
文字水印启用条件
只有当上传图片的宽度和高度都大于此处的设置值时,文字水印功能才会触发,否则,即使上面启用了文字水印功能,也不会生成文字水印。单位px。
l
文字水印内容
当使用文字水印时,水印文字的内容。如:"版权所有…"。
l
文字水印字体颜色
当使用文字水印时,水印文字的颜色。以16进制形式表示颜色值,如黑色对应的是"000000"。
l
文字水印阴影颜色
当使用文字水印时,水印文字的阴影色。以16进制形式表示颜色值,如白色对应的是"FFFFFF"。
l
文字水印阴影大小
当使用文字水印时,水印文字的阴影大小。单位px,默认1px。
l
文字水印字体大小
当使用文字水印时,水印文字的字体大小。单位px,默认12px。
(注:PHP版与字体库有关,默认单位为pt,实际字体大小可以先设定一个值,看效果后再适当修改此值)
l
文字水印字体名称
当使用文字水印时,水印文字的字体名称。
(注:PHP版无此项设置,有“中文字体库及路径”的设置,见下面的说明)
l
文字水印位置
水印文字在图片上的位置。有以下几项可选:左上、左中、左下、中上、中中、中下、右上、右中、右下。分别对应9个常用的位置。
l
文字水印边距
有左右边距和上下边距可设。也可以理解为水平边距和垂直边距。
当文字水印位置设置为居左(左上、左中、左下),“左右边距”的设置表示为左边距;当文字水印位置设置为居右(右上、右中、右下),“左右边距”的设置表示为右边距。
当文字水印位置设置为居上(左上、中上、右上),“上下边距”的设置表示为上边距;当文字水印位置设置为居下(左下、中下、右下),“上下边距”的设置表示为下边距。
l
文字水印文字占位
水印文字实际在图片中所占有的宽和高。此设置由“文字水印内容”、“文字水印字体名称”、“文字水印字体大小”三项确定。当此三项都填好后,您可以点击此设置项右边的“检测宽高”来检测建议的设置值。如果检测到的设置值在实际的图片水印上表现不佳,可以手动微调。
l
图片水印使用状态
有三种状态可选。
不使用: 不使用图片水印功能,所有其它与图片水印相关的参数设置无效
使用: 使用图片水印功能,注意填写图片水印相关的其它参数设置
前台用户控制:使用此模式时,在前台上传图片的对话框中,会有是否启用水印的选项,用户勾选则启用,用户没勾选则不启用。由操作用户决定是否启用。
l
图片水印启用条件
只有当上传图片的宽度和高度都大于此处的设置值时,图片水印功能才会触发,否则,即使上面启用了图片水印功能,也不会生成图片水印。单位px。
l
图片水印位置
水印图片在图片上的位置。有以下几项可选:左上、左中、左下、中上、中中、中下、右上、右中、右下。分别对应9个常用的位置。
l
图片水印边距
有左右边距和上下边距可设。也可以理解为水平边距和垂直边距。
当图片水印位置设置为居左(左上、左中、左下),“左右边距”的设置表示为左边距;当图片水印位置设置为居右(右上、右中、右下),“左右边距”的设置表示为右边距。
当图片水印位置设置为居上(左上、中上、右上),“上下边距”的设置表示为上边距;当图片水印位置设置为居下(左下、中下、右下),“上下边距”的设置表示为下边距。
l
图片水印图片路径
当使用图片水印时,水印图片的路径。此路径为相对ewebeditor/asp/upload.asp(.aspx/.php/.jsp)文件的路径。建议您把水印图片放在ewebeditor/sysimage/目录中,如文件名为water.gif,则实际的路径是ewebeditor/sysimage/water.gif,在此设置输入框则填"../sysimage/water.gif"。
l
图片水印透明度
图片水印的透明效果设置。可填0至1间数值。
0表示全透明(即什么也看不见,不要设为此值)
1表示不透明(即您做的水印图片是什么样的,水印在上传图片上也是什么样的)
0.5表示半透明。
l
图片水印图片占位
水印图片实际在上传图片上所占有的宽和高。此设置由“图片水印图片路径”所指向的图片的宽高确定。当“图片水印图片路径”项填好后,您可以点击此设置项右边的“检测宽高”来检测建议的设置值。如果检测到的设置值在实际的图片水印上表现不佳,可以手动微调。
l 中文字体库及路径
此项只有在PHP版中有。如使用的是英文字体,此项不需设置。如您想使用的是中文字体,则请在此填入字体库的文件名及路径。此文件路径是相对ewebeditor/php/目录的路径。建议把字体库文件拷贝到ewebeditor/php/目录中,如文件名为" simkai.ttf",则在输入框中输入"simkai.ttf"即可。